Mar 14, 2025
 5747
5747
When needed, you may create a write-off on the Billing module Sales/Invoices tab OR on an individual contact's Billing tab. The process will be the same as discussed below. IMPORTANT: You cannot write off an invoice that has already been paid.
- Select Billing in the Navigation Panel.
- Click the Sales/Invoices tab. Customize the list to display only unpaid invoices to make it easier to locate the invoice you wish to write-off.

- Click the
 icon for the invoice you wish to write off.
 - Click Create Write Off

-
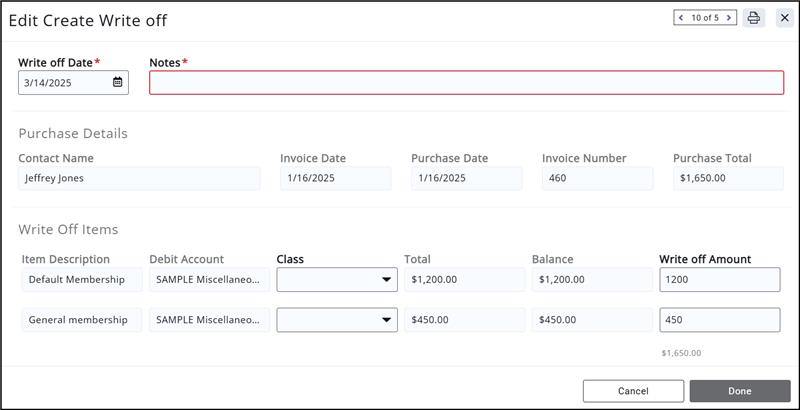
- Configure the following as necessary:
-
- Write Off Date: The date will default to the current date. IMPORTANT: Do NOT set the write-off date to the past, as this will negatively impact your accounting records.
- Notes: This field is for internal use and is a required field.
- Purchase Details: This field displays the invoice details, and may not be edited.
- Write Off Items: This field displays the fee items on the invoice, and the associated account. The Write Off Amount will be populated with the original amount on the invoice. If you wish to only write off a portion of the invoice, enter the amount to be written off in the write off amount fields, for those items that you do not wish to write-off, ensure that the amount is set to zero. The Debit Account will default to the account associated to the goods/service sold, which cannot be changed.

-
- Click Done to complete the write-off.
When a Write Off is created:
- If you are using Cash basis accounting, the revenue was NOT yet recognized so no reversing transactions are created.
- If you are using Accrual basis accounting, a reversing entry is created entry to “undo” an adjusting entry. The account selected as the Debit Account will be debited.
Example:
Invoice created on 1/1/2020, invoice is written off on 8/10/2020
- On 1/10/2020:
- Accounts Receivable is debited $1000
- Event Revenue is credited $1000
- Write-off created on 8/10/2020
- Accounts Receivable is credited $1000
- Event Revenue is debited $1000


