.png)

 8654
8654
Custom Fields are designed to give ultimate flexibility in managing your data. When adding a custom field, you will create a database field that is available for tracking additional desired information. For example, you may wish to track an individual's birth month so that you can send out birthday greetings. Fields may be added to your Member Application Form to capture the information at the time of application, or fields may be added directly to a record.
|
|
NOTE: Your GrowthZone software allows you to use tags, custom fields, and categories. To guide your decision on which to use, see a comparison list. |
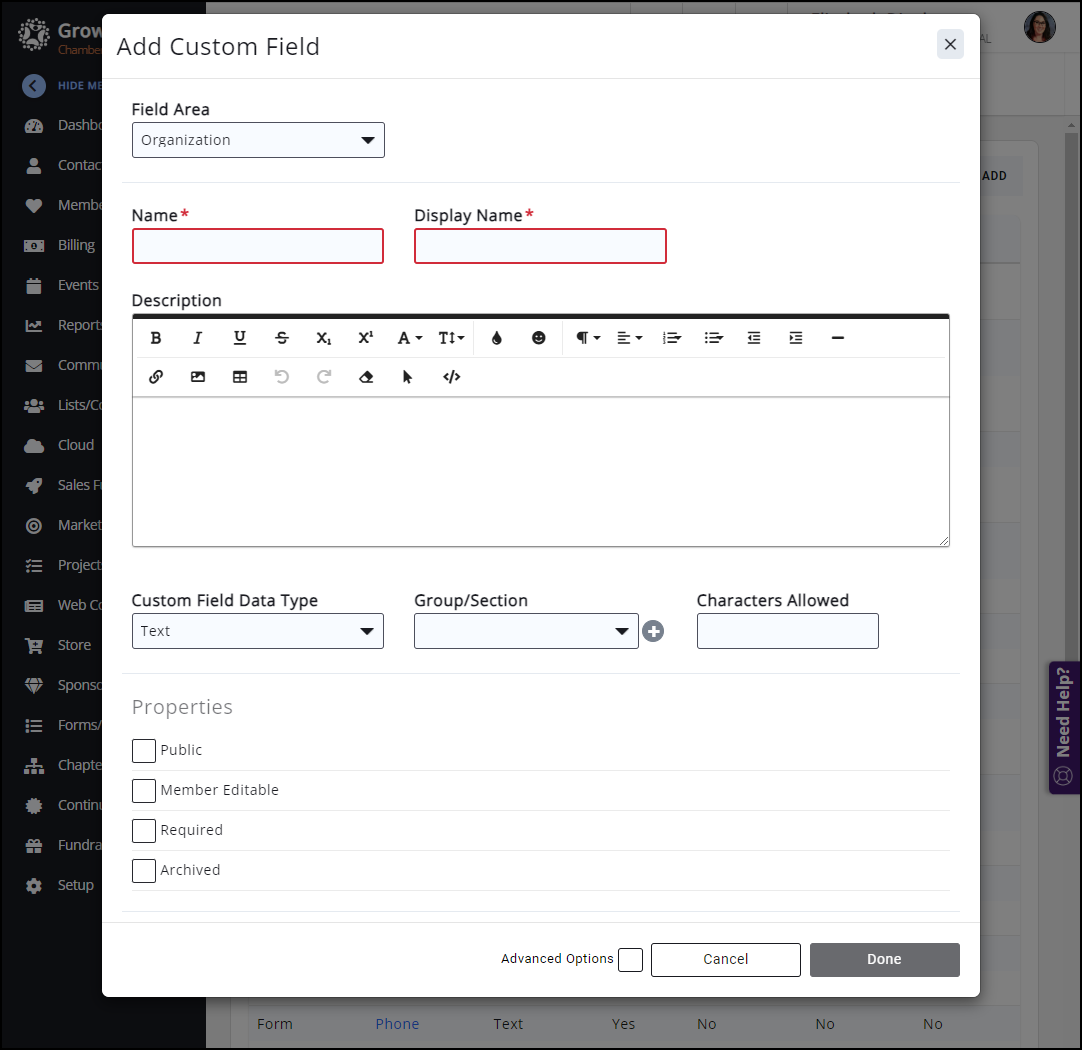
Add a Custom Field
- Click Setup in the Navigation Panel
- Click Custom Fields in the Miscellaneous section. A list of the custom fields currently configured in your database will be displayed.

- Click the Add button in the upper right.

- On the Add Custom Field screen, configure the following:
- Field Area: Select a field area from the dropdown list. This selection dictates where you would like to use the custom field. For example, if you wish to create a field to be used in your Fundraiser, you would select Fundraising.
- Name: This will be used internally by the database. NOTE: Changing the name of an existing custom field may break it; in some cases, although the field may be filled in (for example, on a membership application or a "Contact Us" form), the field will not populate with the entered values in staff notifications.
- Display Name: This is the field that will be displayed to the public. For example, if you are creating a "Meal" field for the selection of a meal choice on an Event, you may wish to enter "Please select your meal choice" to be displayed to the public. This field may include a question or statement, as needed.
- Custom Field Data Type: Select the data type for the custom field.
- Selecting Drop-down will allow you to set up a list of options, and only one option may be chosen.
- Selecting Drop-down with fill-in will allow the user to select a single option OR fill in an option that is not on the list.
- Multi-choice would allow the user to select more than one option from the list of options.
- Group/Section: (Optional) Select the desired group section of this custom field. Group sections are used throughout the software, and you may wish to group similar custom fields.
- Characters Allowed: This option would limit the number of characters that could be entered in a text box response. If you have selected a text box option (text or multi-text) you MUST enter the number of characters allowed, and the value may not be 0.
- Properties: Define the properties for the custom field:
- Public: Select this checkbox if you wish this field to display this field within the InfoHub and your Directories.
- Member Hub: (Advanced Option) Select this checkbox to allow users to edit this custom field in their Info Hub profile. If a custom field is to appear in the Info Hub but is not to be editable, you need only check the property Public.
- Required: (Advanced Option) Select this checkbox to make this field required. NOTE: Making a field required only applies when the member is filling out the form/application/registration/etc- it does not force that field to be required when it is displayed in the back office.
- Archived: (Advanced Option) If you no longer wish to use this custom field, selecting this checkbox will hide the field from being used in the back office, but historical data will be maintained.
- Select Done.
|
|
IMPORTANT: Table-type custom fields do not work on the membership application. Use Multi-line Text fields instead. |
Archive a Custom Field
If you are no longer using a custom field but wish to retain the information gathered by the field best practice is to archive the field.
- Click Setup in the left-hand navigation panel
- Click Custom Fields in the Miscellaneous section.
- Click the hyperlink for the custom field you wish to archive.

- Click Done.
Delete a Custom Field
The best practice if you no longer wish to use a custom field is to archive the field. This will ensure that you retain all historical information. If you do wish to delete the field:
- Click Setup in the left-hand navigation panel
- Click Custom Fields in the Miscellaneous section.
- Click the hyperlink for the custom field you wish to archive.

- Click Delete.
- Click OK to confirm that you wish to delete this field. There is no "undo" so be certain that you are deleting the desired field. GrowthZone may be able to perform an undo but charges would apply.

