.png)

 3380
3380
Now Available! Want a walkthrough? Click the "Need Help?" tab on the right side of your screen for a guided tour!

The Broker tab is a page available in the Memberships module that is only available to GrowthZone Real Estate Edition subscribers. This page Is a Broker centric view of memberships to help Real Estate Association staff be able to communicate effectively and concisely with their Agents.
A single broker could have multiple offices and many, many agents as part of their brokerage. Because of that, we’ve provided staff a way to generate statements for these brokers, that showcase all of the agents they are responsible for. Staff can easily email or mail their Brokers (and office managers, if applicable) the necessary information they need to make proper payment.
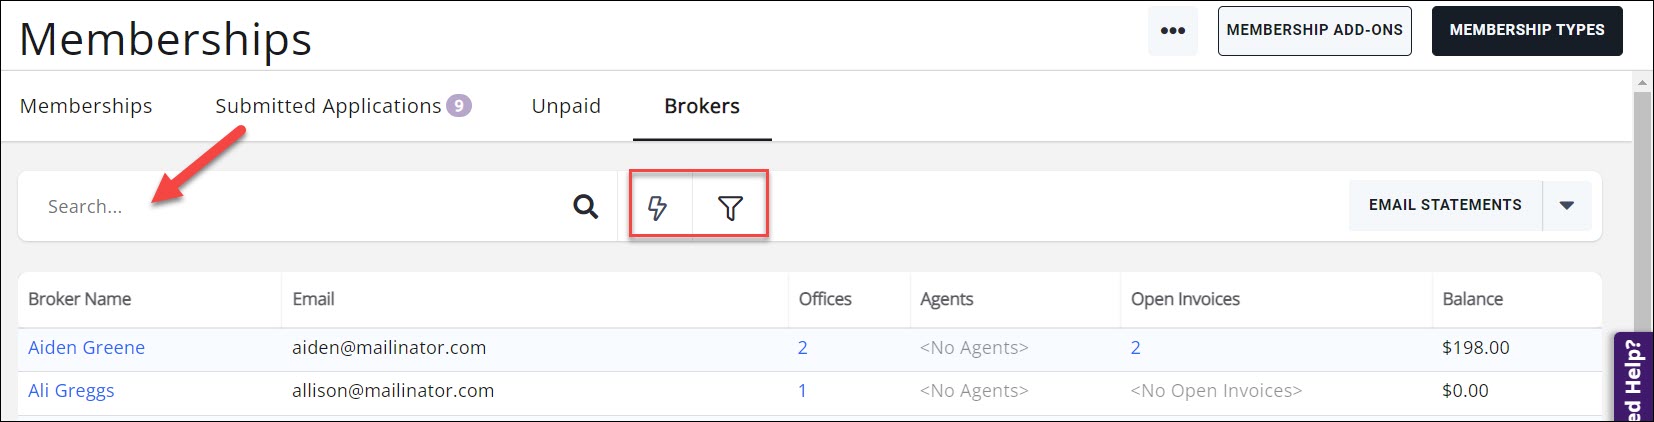
The Broker tab will be a table of information: the broker, their office(s), their agents, and all the open membership invoices associated with that broker.
|
|
IMPORTANT! Invoices included in the Broker statements are only those associated with a membership. Example: If an association bills the broker for MLS penalties, Room rentals, transfer fees, new idx feeds, etc. and/or manually creates invoices, then those will NOT be included in the statement.
|

An association staff person will be able to filter the information via the Search, Quick Filter or Customize Filter options.
- Search: You can use the Search option to pull up a specific broker or brokers by typing their name(s) in the Search field.
- Quick Filter dropdown: this will apply the selected filter to the display. Currently, you can select to display only brokers that have agents with open invoices, or use the Customize Filter option to further filter the display.
- Customize Filter: this option will allow you to apply multiple filters to the display.
Use the Customize Filter to filter on the type of membership (e.g. MLS membership or REALTOR), membership level, membership status, tags, invoice date, and/or open balance. Statements will be emailed or printed to those shown in the filtered results.
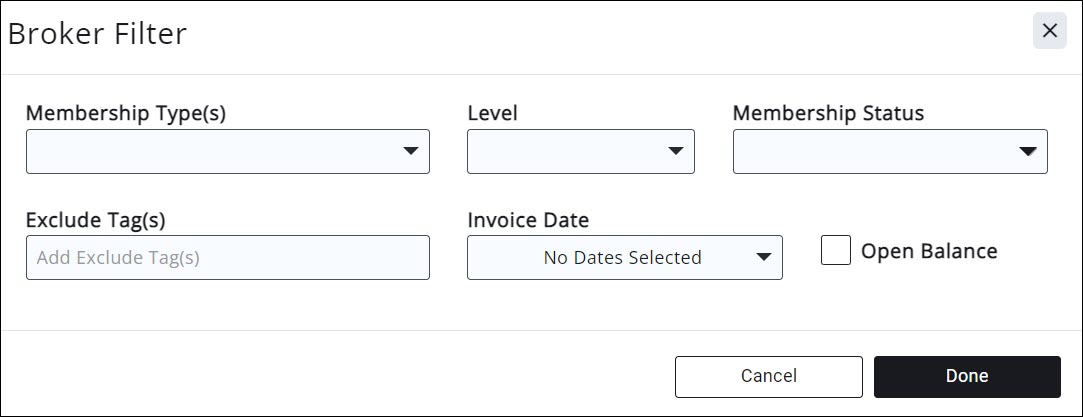
Unlike the Grouped Statement, this can be sent to the Broker rather than to a single office and allows a Broker with multiple offices to receive one statement.
Pre-requisites
All new REALTOR® databases are prepopulated with the End User Access Levels of Broker and Office Manager. During setup, the conversions and onboarding teams will work to ensure that the Role of Broker is set between the brokers and the offices they manage.
Existing customers that wish to use this new functionality will need to set this up.
|
|
How do I know if this has been set up in my system? Typically, if this is setup for you, you will see at least one broker listed on the Memberships > Broker tab. If the Broker tab has none listed at all, chances are that you need to follow setup instructions. |

The size and scale of your association will help determine if you can do this manually or if you should request help from Customer Service to get your broker tab set and working. Many associations already have their Broker or designated realtor set as the primary contact for an office and have them setup as User - Primary for the offices. Follow the instructions noted in the "Set up the Broker Tab" section to assist in your setup process.
Overview:
The Broker tab contains columns for the broker name, email, the number of offices they are affiliated with, the total number of open invoices, and the total balance of those open invoices. The display can be customized to show or hide any of the columns by clicking the ![]() icon and selecting or deselecting the preferred columns.
icon and selecting or deselecting the preferred columns.
There are two options for delivering broker statements available when clicking the down arrow next to the Email Statements button.
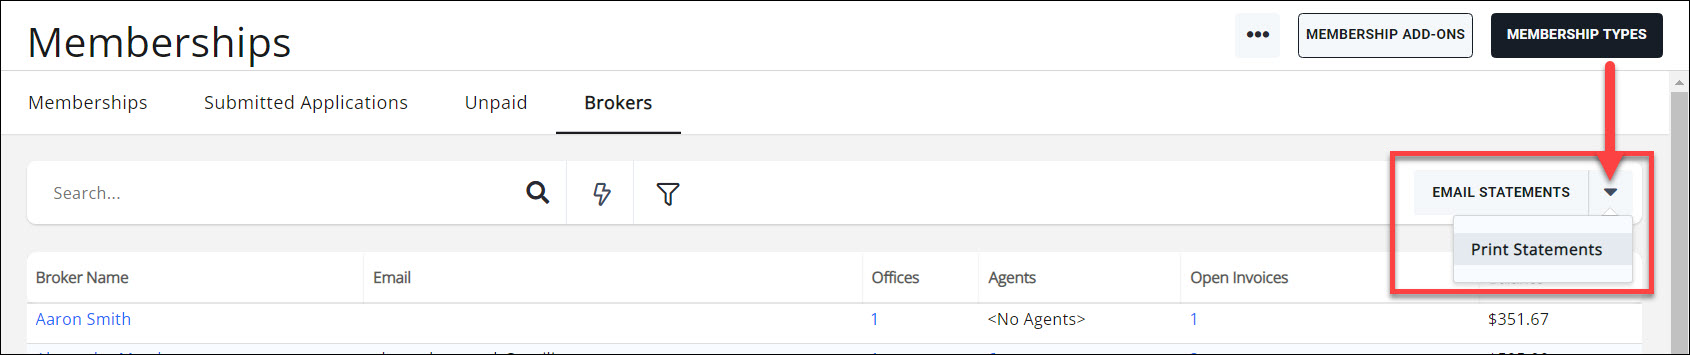
- Email Statements: this will email all the displayed brokers a statement of all the open invoices of their related agents, grouped by office.
- Tip: If “Also Send To Office Manager(s)" is selected, it will send an email to the default email address of the contact(s) marked with the “office manager” access level for that office. The office manager email will contain a statement only for the office that they are managing.

- Tip: If “Also Send To Office Manager(s)" is selected, it will send an email to the default email address of the contact(s) marked with the “office manager” access level for that office. The office manager email will contain a statement only for the office that they are managing.
- Print Statements: this will create a printable document of the open invoices of each displayed broker.

- Notes:
- Printed statements only provide a copy that is for the entire brokerage; there is not a statement that is specific to a particular office manager.
- To view progress of your PDF download and/or to download when complete, go to View Export Jobs in the upper right Account menu. You will also find the completed download in the Cloud->Invoices folder.
- By default, two statements are available to choose from:
- BrokerStatementByOfficeWithPay.docx – a statement for broker, split into a separate page and separate totals for each office, agents listed in alphabetical order by first name. Each statement includes a ‘pay all offices’ link at the top of the statement for a broker and a then a separate payment link to pay all invoices for a specific office at the bottom of each office grouping.
- BrokerStatementByOfficeWithoutPay.docx – exact same statement as above, but no payment links are included.
- In both Email Statements and Print Statements, if a specific statement template is not selected, then the statement labeled “BrokerStatementByOfficeWithPay.docx” will be used by default.
- Notes:
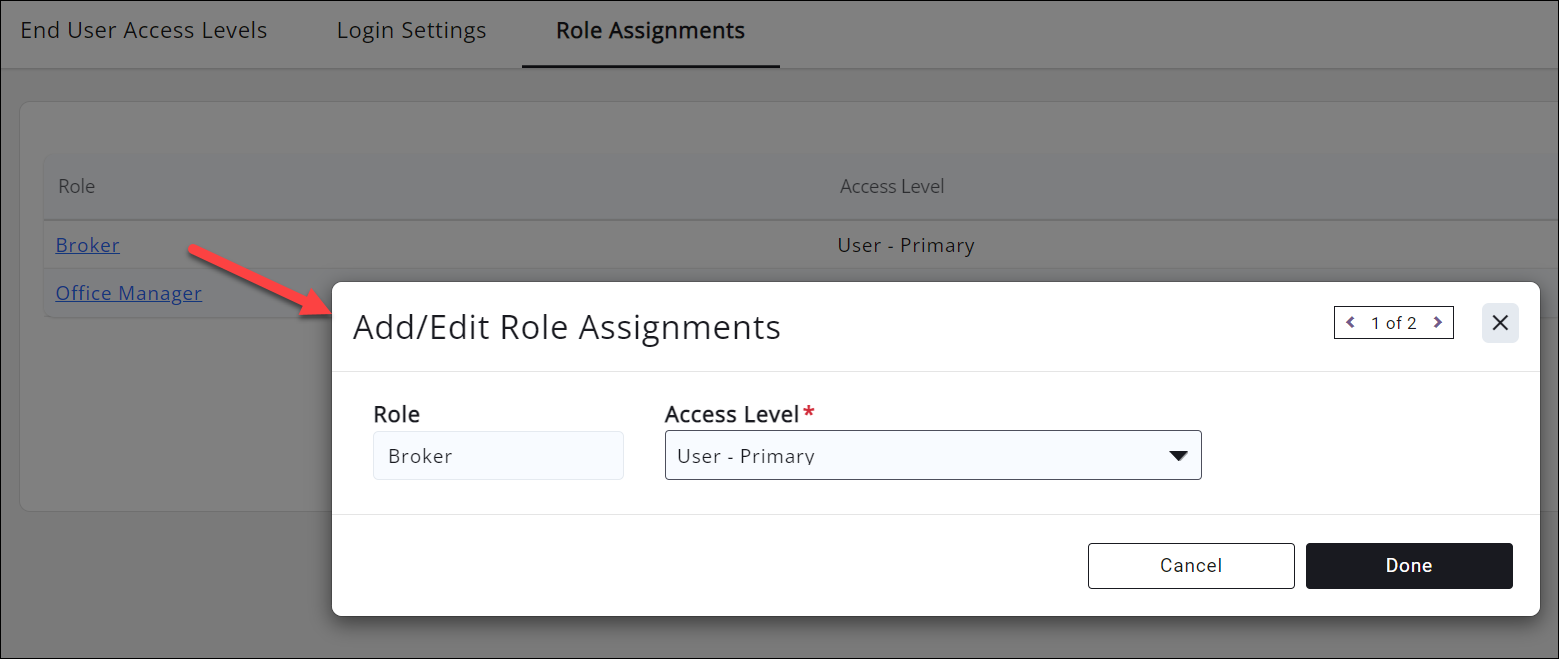
Brokers are identified by the assignment of an access level that is tied to a Role Assignment. This assignment only needs to be set up once. Then going forward, the only action required is for staff to make sure each contact has the appropriate access level assigned.
Select Broker Role Assignment
- Go to Setup > Staff and User Access > End User Setup > Role Assignments
- Click on the Broker role and assign the desired access level.
If you can use an existing access level that is already assigned to your contacts, that will likely save you the most time. Examples of access levels that could likely be used:
- User -– Primary is a common example of the access level you could select when you are an existing customer. Why? User – Primary was often the access level given to the broker in the earlier conversions.
- Broker – Newer customers will often have an access level called “Broker” which was assigned to each broker. That could then be selected as the Broker Role Assignment.
If you would like to start fresh, you can optionally create a new access level with the desired permissions. Assign that access level as the Broker Role Assignment. Then you can either manually assign this to each Broker or use the “Set Contact Org Access Levels” under Setup>Data Tools to assist in mass assignment. See Tips below for updating contact access levels.
|
|
Tip: You can rename the existing access levels to suit terminology that is more common in your association. i.e. you can call it DR or Managing Broker. |
Navigate back to the Broker tab and review. Take some time to validate if this brings in most or all of your brokers, or if it also brings in other non-broker individuals. You may need to assign a different “non-broker” access level to non-brokers to stop them from showing in the Broker tab.
Tips for updating access levels:
- You can do the update manually if you’d like: for every office, ensure that the broker is set as such by editing the contact’s relationship to the org.
- You can use a Data Tool “Set Contact Org Access Levels” if your Brokers are set as the Primary Contact for the organization. Do this by filtering to the Primary Contact and mass update them from User-Primary (or current Role) to Broker.
Select Office Manager Role Assignment
1. Go to Setup > Staff and User Access > End User Setup > Role Assignments
2. Click on the Office Manager role and assign the desired access level.
If you can use an existing access level that is already assigned to your office manager contacts, that will likely save you the most time.
|
|
IMPORTANT: This access level should be different than the access level assigned to the Broker Role. If not, then office managers would also be display as Brokers on the Broker tab, meaning they would get statements for ALL offices, not just their own. |
If your office manager is presently assigned the same access level as the broker, you should create a new access level with all the same permissions as the broker, but just give it a unique name (such as User – Primary Office Manager), then assign this new access level to each office manager. Manually assign this to each office manager, or if there is something consistent in these office manager contacts that could be identified (for example, they may all have “Billing Contact” in their title), then you could ask for Customer Service to submit a data update request to have these assigned in mass for you.

