.png)

 6507
6507
The Sponsors/Ads module provides options for offering advertising opportunities to your members. This will give them additional exposure, as well as bring in additional revenue to your association. Through the back office you can upload and manage member advertisements, including the ability to select which module page the ads should appear on, which member the ad runs for, and what size of ad should display (the software provides you with a list of common advertising sizes, so you can easily place these on your website).
|
|
NOTE: The Sponsors/Ads module is required to use this functionality. |

IMPORTANT! If you are logged into your database and do not see ad sizes or existing advertisements, check to see if you have an ad-blocking software/extension in your browser. Ad Block Plus will block the elements on these pages if you do not turn it off for your GrowthZone pages.
Set Up Ad Sizes
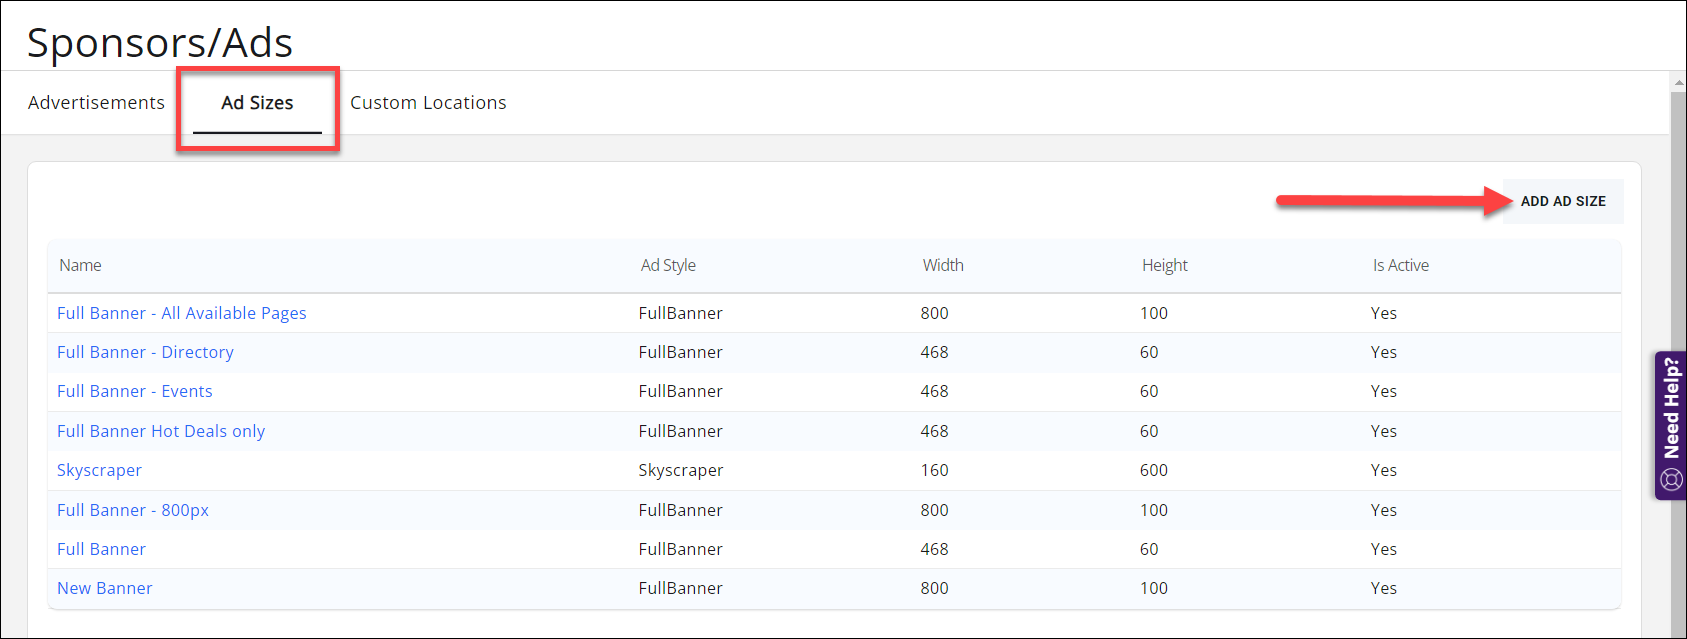
Navigate to the Sponsors/Ads module via your left navigation panel and click into the Ad Sizes tab.
Click the "Add Ad Size" button.
- Select an Ad Style from the dropdown menu.
- Give the ad size an easily identifiable Name; this will help if this ad size only appears on a particular page or module (such as the Directory).
- Specify the Width and Height of the ad. These fields will populate with defaults according to the ad style selected, but can be changed.
- "Is Active" should be enabled.
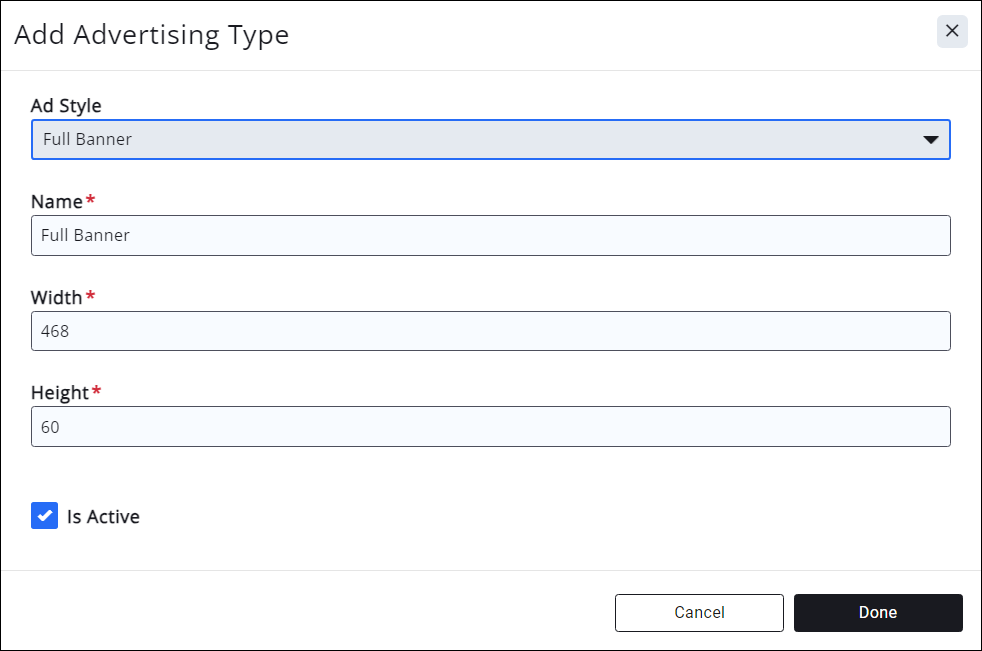
Click Done to save your new Ad Size.
Next you will need to set up the advertisement itself.
|
|
IMPORTANT: If using a “skyscraper” style of ad (tall and narrow, that you want to display on the sides of your webpage), before proceeding you will need to set up custom locations and generate HTML code for those pages, THEN you will follow the steps to set up an advertisement. In addition, you will also need to set up a custom template or a template override for those pages that will display skyscraper-type ads. |

Set Up the Advertisement
Once Ad Sizes are configured, you may add the actual advertisements and images to your integrated webpages. See how to publish GrowthZone content, and how to add pages to display that content to your GZCMS website.
|
|
IMPORTANT: If you do not have a GZCMS website, or wish to place advertisements on non-integrated website pages, you will need to set up custom locations and generate HTML code for those pages FIRST, then you will follow the steps below. |
Go to the Advertisements tab and click the "+ Add Ad" button.
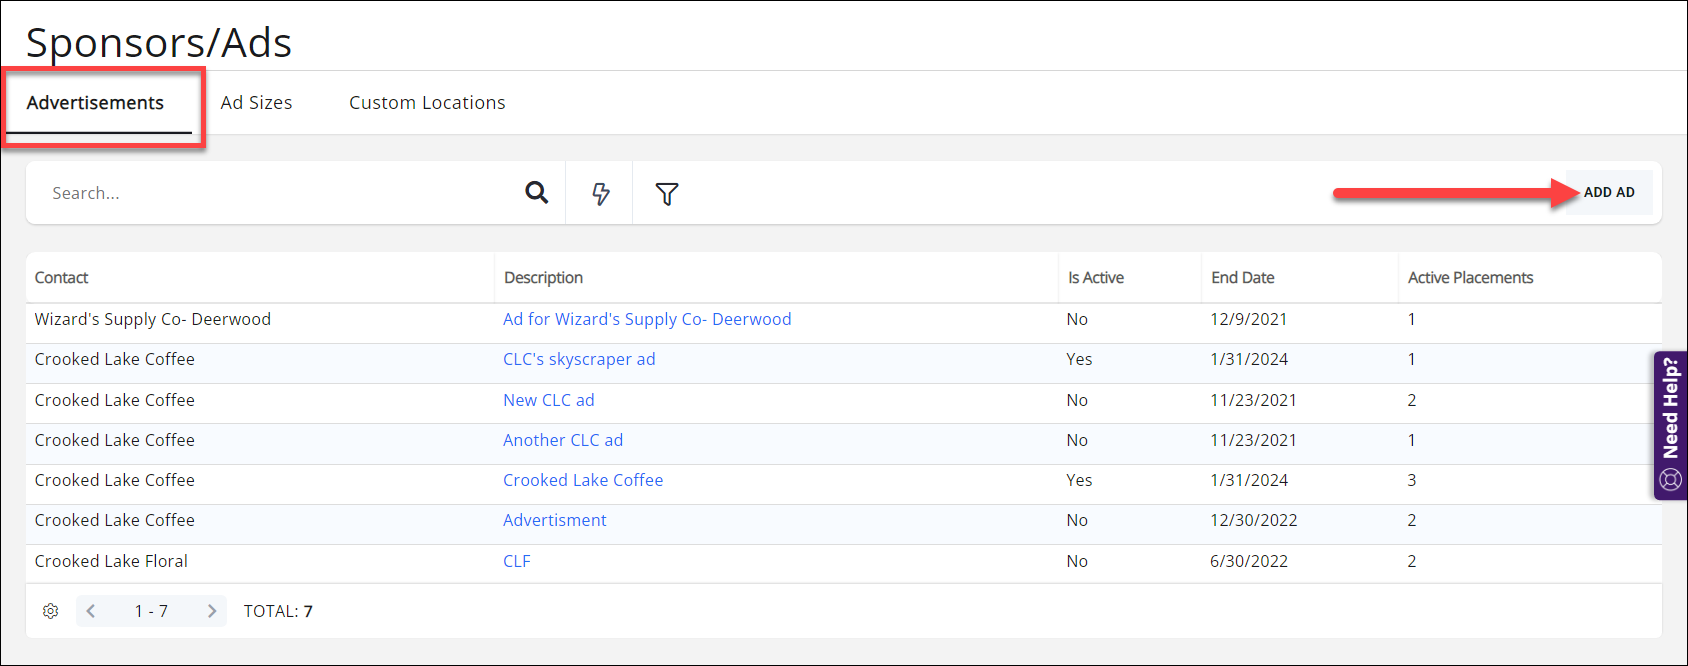
- Enter the contact (company or individual) the ad is for, and give the ad a description.
- If this ad will only run for a limited time, enter the start and end dates.
- If the ad includes a link to an external URL (i.e. a website), enter or paste that link in the Advertisement URL field. You may choose to have the link open in a new window (recommended, but not required).
- Select the desired Ad Size from the dropdown. You may choose an ad size you have entered, create a new ad size by clicking the
 ,OR you may manually enter ad dimensions.
 - Click the Display Ad Image icon to either upload a new image, or browse to an image you have already uploaded to the Cloud. NOTE: It is recommended to create ad images prior to this step so they are sized appropriately for the spaces (ad sizes) in which they will display.
- Placements: this will select the page or pages the ad will display. Click the
 to add an ad location; select the preferred page or custom location from the dropdown, and specify the location of the ad (top or bottom). When selecting a Directory, you also will have the option to specify a category where the ad will display. You can add multiple placements for a single ad/image; if there is more than one ad/image for this contact, you will need to create an advertisement for each unique image.
Click Done and the ad will now display on all the selected pages.
|
|
NOTE: if you open an existing advertisement, the "Ad Size" dropdown will default back to "Select an Ad Size", but it will retain the width and height set previously. |
Set Up Custom Locations (Optional)
Advertisements may be added to non-integrated webpages such as your home page or any other page on your website, and can also be used with non-GZCMS webpages.
|
|
IMPORTANT: Adding Custom Locations into non-integrated/non-GZCMS webpages requires the ability to edit the HTML of those webpages. If you don't know what that means, or do not know how, please reach out to whoever is in charge of your website! |
- Go to the Custom Locations tab and click the Add button. Enter the name of the page to which you are adding the advertisement and click Done.

- Click Done to save.
- Click to down arrow next to the Add button and select Generate Ad Widget.

- On the Generate Website Widget window, in the Ad Locations menu, select the name of the custom location added in step 1. Adjust the animation type and maximum results (number of ads to be displayed in that space) if needed.

- Copy the generated code from the lower right pane and paste it into your website's HTML editor. Click Close.

Copy the code in this area and paste it into your website's HTML editor. - Once the code has been copied, pasted, and saved in your website's HTML editor, go back to the Advertisements tab and click the Add Ad button.
- Follow the steps to add an advertisement, and in the Placements section of the Edit Display Ad window, select the custom location you created in step 1.

Selecting the Custom Location and Position - Click Done and the ad(s) will now display on the webpage(s) to which you have added the generated ad widget code.

