.png)
Configure Default Finance Settings

Aug 01, 2024
 10960
10960
- Click Setup in the Navigation panel.
- Click General Settings in the Finance section

-
Set Logo for Invoices and Statements
- Click the pencil icon below Logo for Invoices and Statements. NOTE: the icon is visible when you dwell the mouse below Logo for Invoices and Statements.
- Click Upload to browse to the location of your logo. Recommended image size for a finance logo is 500px wide by 150px tall.
- Click Open.
- Crop the image as needed, then click Crop & Save. The logo will now be displayed on all of your invoices and statements.
-
Set Default Accounts
- For each of the listed accounts, select your default. This default will automatically be applied when you create fee items, but you will be able to over-ride if needed. IMPORTANT!! These accounts should be setup to match the accounts in your accounting software. Replace all system defaults!
- Overpayment Accounting Transaction: This setting allows you to select what accounts an overpayment should debit/credit when an overpayment is created by overpaying an invoice:
- Record in accounts tied to the overpaid invoice will create the overpayment using the Accounts Receivable (A/R) and Deposit account of the original invoice.
- Record in default accounts will debit/credit the A/R and Deposit accounts that are selected as the default under Setup>Finance>General Settings. As of 7/30/2021 this option is enabled by default.
- Default Templates for Transactions. These templates will automatically be used anywhere you are creating a transaction in the database. Recommended that you choose the templates that you wish to use the majority of the time. In most cases, these defaults can be overriden when you are creating the transaction. For example, the invoice template can be overridden in the following situations:
-
- You can apply a specific invoice template to a membership type: Add Pricing to A Membership Type
- You can apply a specific invoice template when delivering invoices: Deliver Invoice via Email and Print Invoices for Delivery
- You can apply a specific invoice template when re-delivering invoices: View Past Due Invoices Refer to Setting up Your Invoice Template for details on setting up a template.
-
- Select your Default Invoice Terms. Select the terms you wish to use by default.
- Allow Deletion for (days) - This setting determines the number of days within which any transaction may be deleted ((invoice, payment, write off, credit, refund, applied overpayment/credit, etc). . Best practice is to limit the transaction window, as once an invoice is deleted, it is completed removed from your view which could cause issues with audits and/or reconciling. Additionally, there is risk that an invoice deleted from the database may already have been posted to your general accounting software. This would cause the two systems to become out of sync. The system provides a Void option that can be used instead of deleting. A void will create a counter entry. The option to edit line items on an invoice also ties to this setting. IMPORTANT! You must have full control over Finance Settings to view and change this setting.
-
Scheduled Billing Settings

- If you wish the system to automatically generate invoices for recurring billing enable Use Automated Billing. You will then enter the Lead Time Days. Lead time days is the number of days ahead of Next Bill Date that invoices are created when Use Automated Billing is enabeld. You will go to the Pending Delivery tab under Billing to actually send the invoices. This lead time gives you time to review invoices, apply credits, and apply un-applied payments, etc. before sending out the invoices. NOTE: Billings that have stored payment profiles will be charged on the actual Next Bill Date.
- Months Back Allowed: This setting allows you to set the number of months back you will be able to look back for invoices that need to be created, when manually running upcoming billing from the Upcoming Billing tab in the Billing module.
- Auto Apply Credits to Newly Created Invoices: this setting will automatically apply any overpayments or credits on a contact's profile to a new invoice. IMPORTANT: The credit will be apply regardless of the fee item associated to the credit. For example, you may have created a credit for an event registration but enabling this setting would apply it to membership dues.
- Invoice before Autopay: Enable this option to create invoices for contact who have a payment profile attached to a scheduled billing in advance (either when invoices are automatically generated or when billing is manually run). Invoices will be created without charging the credit card. On the actual invoice Next Bill Date, the system will then automatically charge the profile. See Create Invoices prior to Charging Stored Payment Profiles for further details.
- Automatic Invoice Emails: Enable this option if you wish the system to automatically send out your invoices once they have been generated (either automatically or manually). If selected you will then choose the Email Template that you wish to be used when the invoices are sent. IMPORTANT!! Invoice before Autopay and Automatic Invoice Emails are mutually exclusive. You can only choose one or the other.
-
Event Invoice Tracking
- My Association typically tracks and records information under the: This setting allows you to configure whether event registrations invoices should be tracked on the business (member) account tab, or the individual account tab. NOTE: When Advanced Options are enabled the setting "Tie to Parent Organization" is displayed. In a Parent/Child relationship, if this option is enabled, the invoice will be tracked on the parents' account tab.
-
Invoice Number Editing
- Click the Allow Invoice Numbers To Be Edited check-box if you wish to allow for invoices numbers to be edited after an invoice has been created. If this option is enabled, a warning message that will be displayed if an invoice number is duplicated. This setting is disabled by default.
- Next Invoice Number: This field displayed the next sequential invoice number, and would allow you to set the starting number for invoices. It will increase each time a new invoice is created.
- Allow Partial Payments: Select this option if you wish to allow users to make a payment less than or greater than the invoice total. If this is not selected the user must pay the full amount of the invoice when making a payment.

-
Payment Terms & Conditions

- If you wish to display terms & conditions on your online payment screens enable Payment Terms Visible
- Payment Terms Title: Enter a title for your terms & conditions to display on the payment screen
- Payment Terms Summary: As terms & conditions may be quite lengthy, enter a summary of the terms & conditions to display on the payment screen.
- Terms & Conditions: If you have not already created terms & conditions go to Setup > Finance > Terms & Conditions. Once created, select thoseyou wish to apply to payments.
-
Info Hub Finance Settings

Info Hub Finance Settings - Allow Info Hub Users to Access Related Contacts Invoices: Select this option if you wish to allow Info Hub users to view and pay other staff's invoices. The contacts must be assigned an access level that allows full control for the Related Contacts. See Create a New Access Level - Users (Members) for more information on how to set up an access level.
- Allow Info Hub Users to Select Invoice Delivery Method: Select this option if you wish to allow user, via the Info Hub, to change how they receive their invoices.
|
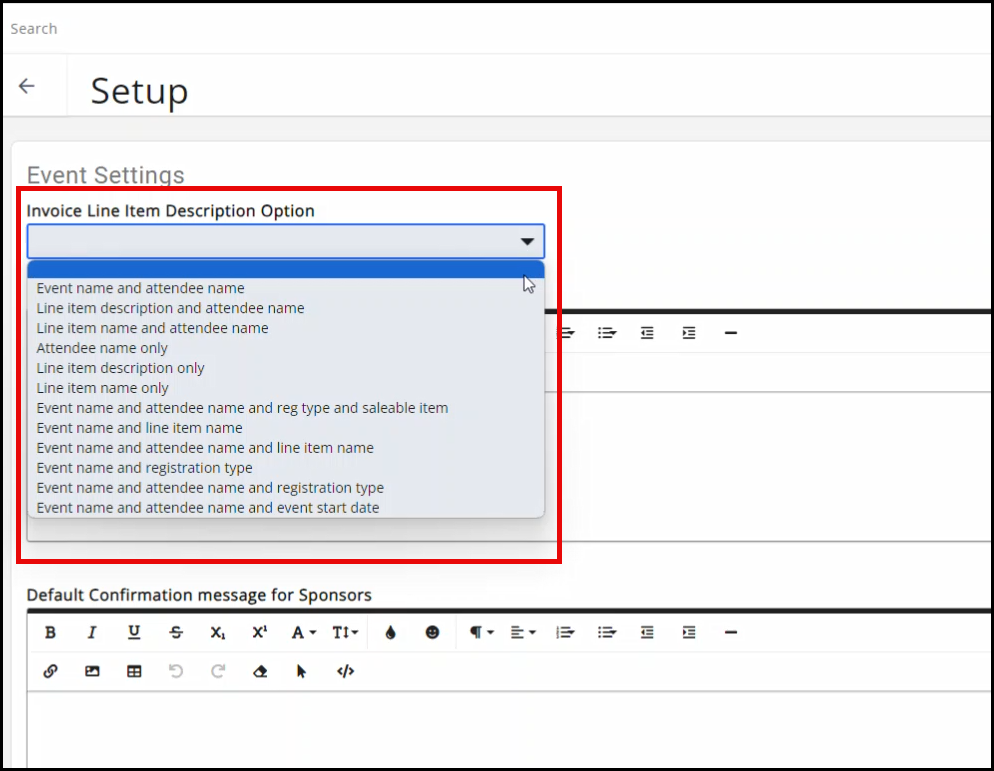
|
NOTE: For, Invoice Line Item Description Option, select what you like to be included in the invoice line items. The screenshot below includes the list of possible options for Invoice Line Item Description. |