.png)

 15212
15212
Event Details (aka the Overview tab)
The Overview tab of your event allows you to update the information supplied when the event was first created.
Click on the pencil icon to the right of the Section name you want to edit.
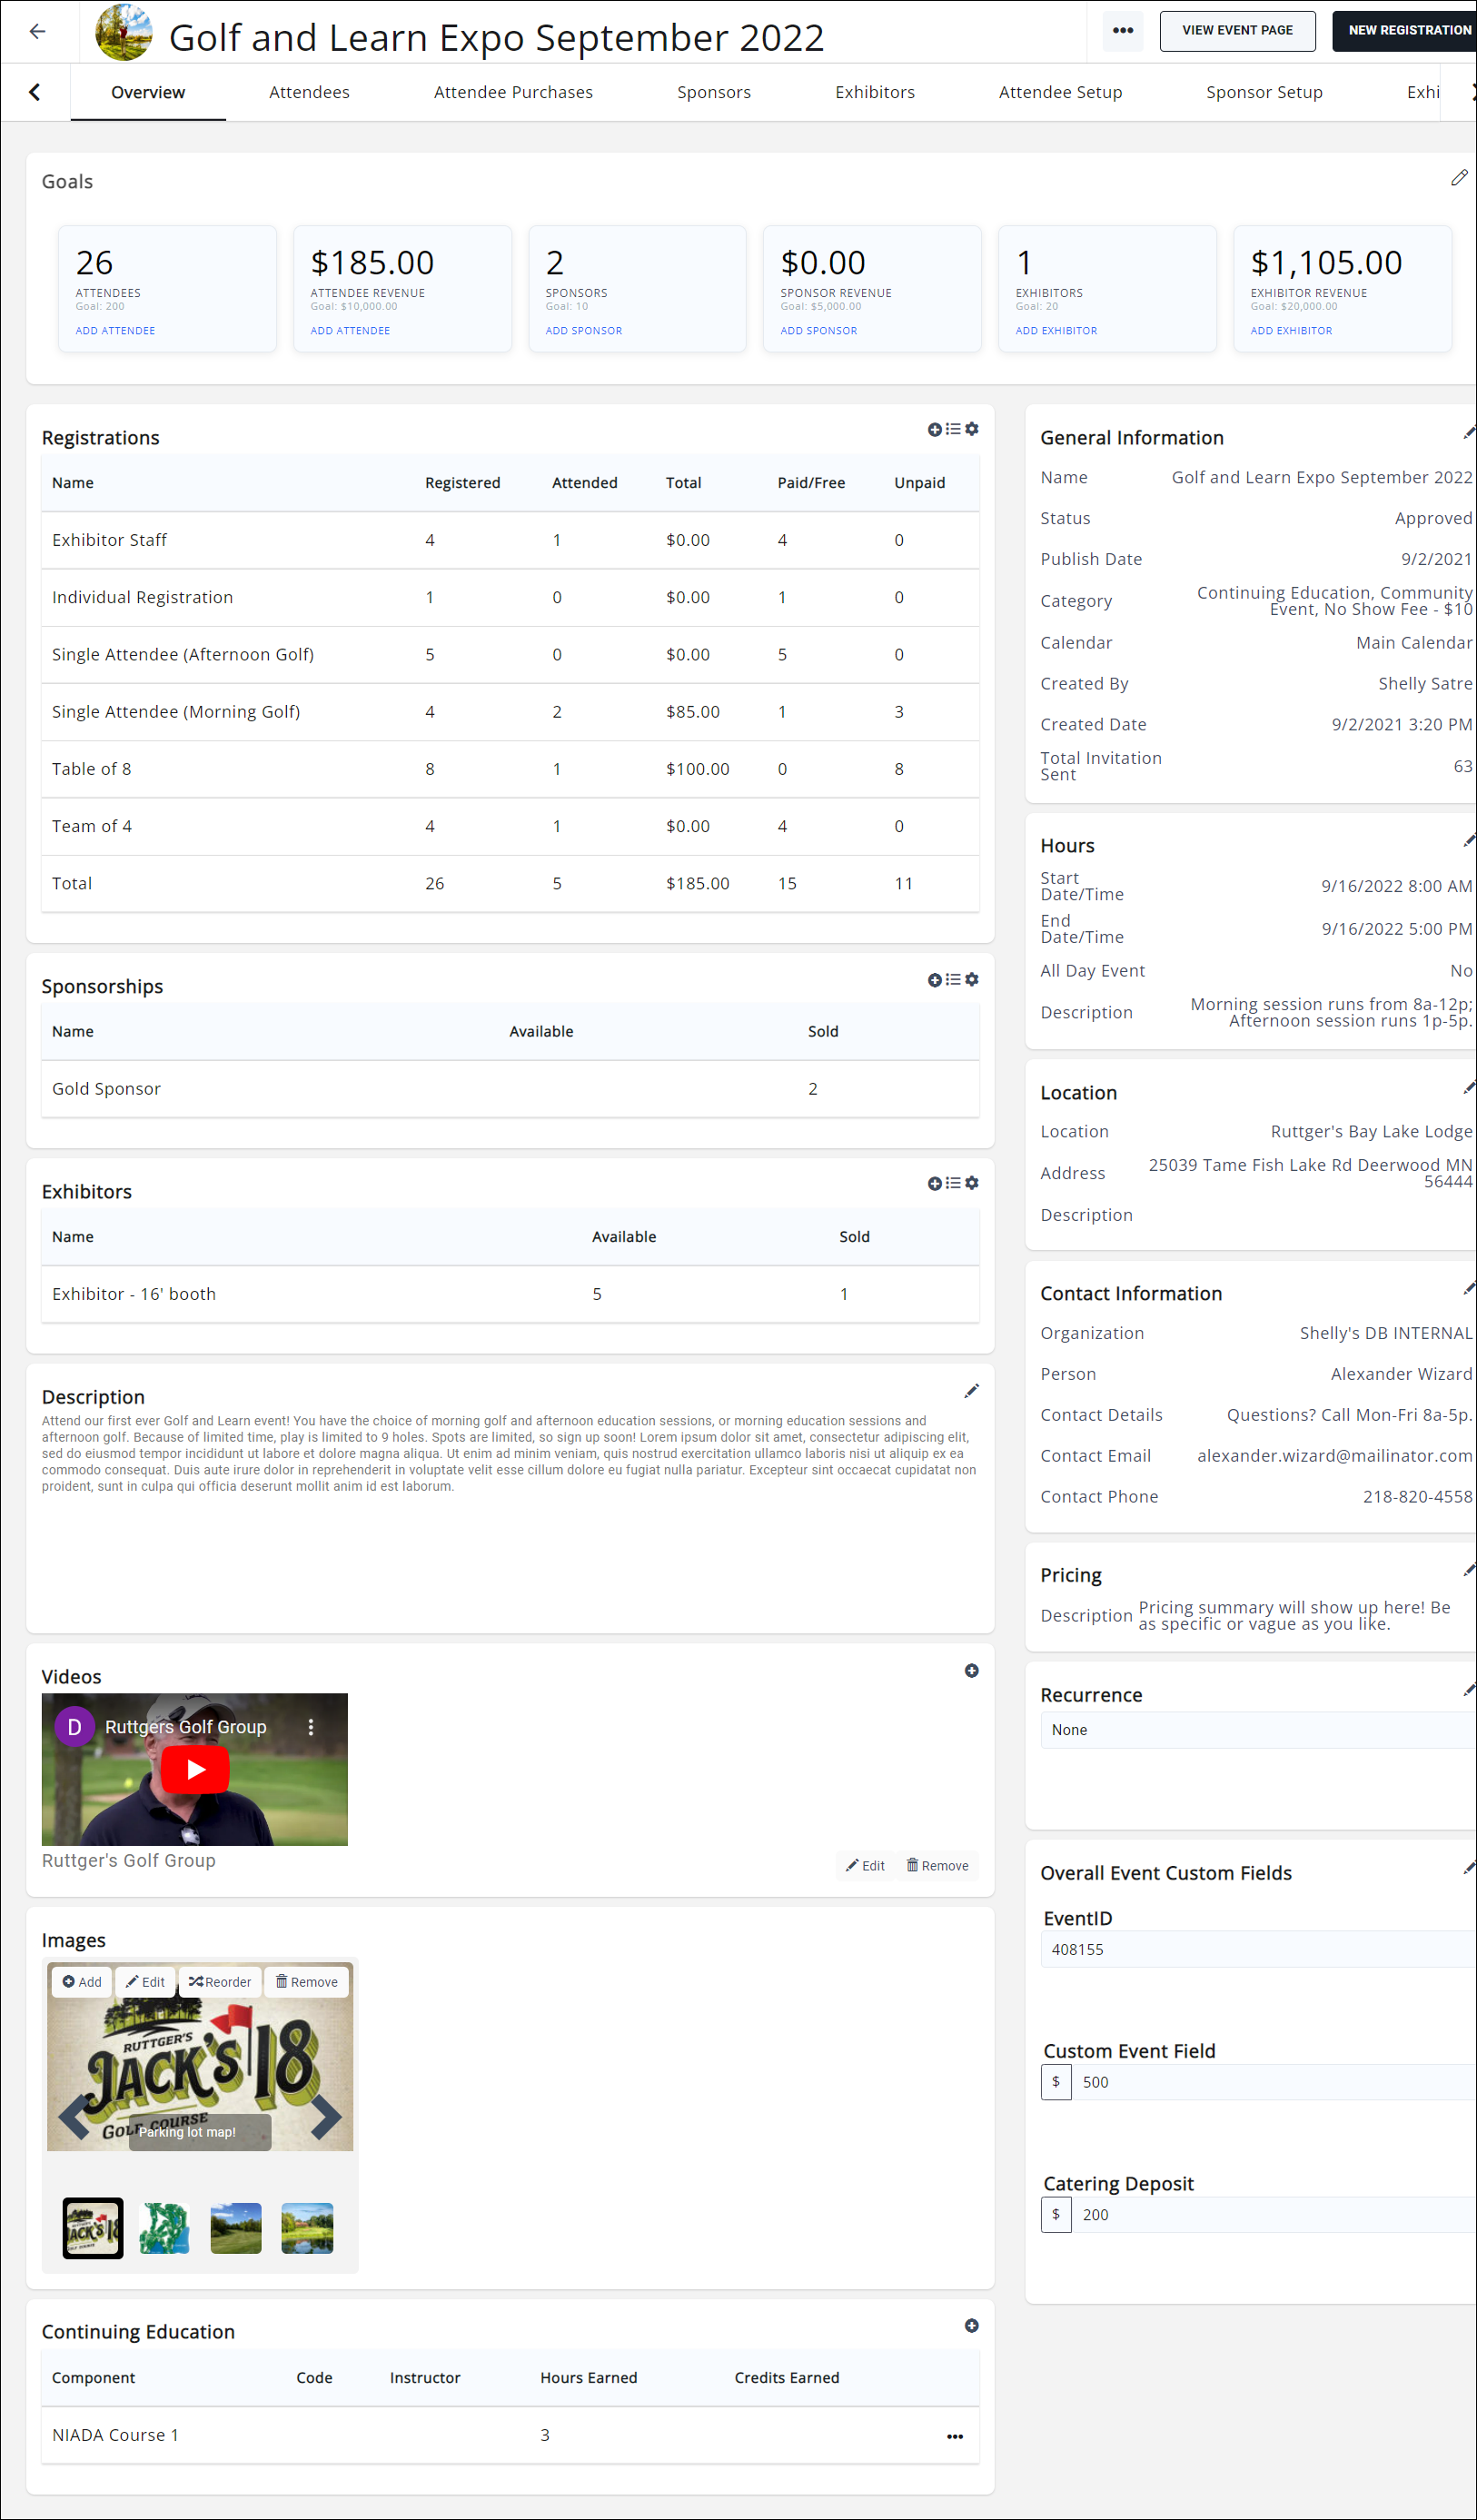
A few of the sections have options available from the Overview Tab that aren't available during the initial set up.
Event Logo

- Click the image icon next to the event name. The Image Manager will be displayed.

Image Size: Minimum 150 x 150 pixels at 72 dpi, but social media networks look for images over 200x200px when sharing. so we recommend larger. - On the Image Manager screen, you may either drag & drop the image onto the screen OR click the upload button to browse to your image, and upload.
- Position selection rectangle around area you would like to use.
- Click Crop & Save.
This image is the "search logo" for the event and will be displayed next to the event when viewing the events in List View on the website or in the Info Hub.
General Information
The General Information section will allow you to edit:

- The name of the event
- The category or categories assigned to the event
- The event payment gateway
- Event status
- Event publish date
- Event calendar or calendars
- Additional Options:
- If you have the Expo module add-on to GrowthZone, will also see the options to enable Exhibitors and/or Sessions.
- If you have a GoToWebinar or Zoom integration set up, you will be able to enable/disable a sync with those integrations from this section.
- The option for an automated reminder email
Description
In the Event Description options, there is a field to enter "Registration Instructions".

These instructions appear at the top of your event registration page.

You can also add or edit the Event Description.

This appears at the top of the event page and registration page.
Event Page:

Registration Page:

The Short Description will populate automatically with the first few sentences of the Event Description, but please note- if the event Description is changed, the Short Description DOES NOT automatically update. You will need to copy and paste the new event Description into the Short Description area to update it. This does allow for the Short Description to be different than the event Description- the Short Description appears in Search results and in card and list views of your website calendar.

Search Results on the website calendar:

If you need to add specific instructions regarding the actual registration types themselves, please see Customize Registration Instructions and Confirmation Messages.
Sponsorships
This section will only display if you subscribe to the Sponsors & Ads module. It will display any purchased sponsorships for the event. You can also add a sponsorship by clicking the plus sign.

Exhibitors
This section will only display if you subscribe to the Exhibitors module AND have Exhibitors enabled for the event (see the General Information section). Just like the Sponsorships section, purchased Exhibitors will be displayed here, and you can add an exhibitor by clicking the plus sign.

Videos
You can embed a YouTube or Vimeo video on the event page. NOTE: YouTube Shorts type videos WILL NOT WORK. It must be a full YouTube video and NOT a Short. Vimeo links must be public.
- Copy the URL of the video you want to display from where ever it is being hosted: you are simply "pointing to" the video in order to embed it, you are not uploading it.
- In the Videos section click the plus icon.
-
- Paste the URL to the location of your video. NOTE: GrowthZone only supports YouTube video links at this time. NOTE: YouTube Shorts type videos WILL NOT WORK. It must be a full YouTube video and NOT a Short.
- Click Done.

NOTE: Copying and Pasting the URL is not a requirement; if you know the address you can simply type it in.
Location
In the Location section, add the actual address in the address fields. Both the address and the description will display on the event page; the completed address fields will also trigger a map to be displayed.

On the Event page:

Recurrence
If the event is part of a series (i.e. events that occur on a regular basis with a repeatable pattern), you can initiate and/or manage the recurrence options for the event series here.

Create a Recurring event series
- Create your event, as described in Add a New Event.
- On the event's Overview tab, click the
 in the Recurrence section.

- Enter a name for the series.
- Enter a description of the series.
- In the Series Start Date box, enter the date of the first event.
- In the Series End Date box, enter the date of the last event in the series.
- Select from the following Recurrence Pattern options: Daily, Weekly, Monthly, Annually. This allows you to specify how often the event occurs.
- Select the Relative Date check-box if the event is to recur on the same day of a week:
-
- Specify the On the option, Day of The Week option, and the Every n months option. For example, if you wish to set up an event for the third Thursday of every month, configure your settings as shown below:
- Specify the On the option, Day of The Week option, and the Every n months option. For example, if you wish to set up an event for the third Thursday of every month, configure your settings as shown below:
-

-
- Or if the recurrence is not on a Relative Date, specify the exact Day and Every n months. For example, if you wish to setup an event for the 23 of each month, configure your settings as shown below:
-
- Click Done.

A gray box will be displayed on the Overview tab indicating that this event is part of a series.

|
|
NOTE: If it is necessary to edit the recurrence schedule:
|

Make Changes to a recurring event series
Information such as the location of a recurring event, descriptions, contact information, etc. may be updated for an entire event series. NOTE: If there are no registrations or sponsors attached to any future events within the series then you may edit the recurrence settings. When making a change, you are only able to extend the date out, not move it back - unless you change the frequency.
- On the Overview tab for any of the events in the series, click the click here link in the grey box.
-
- The Edit Event Series dialog box will be displayed, shown partially below.
-
- Update information as needed. NOTE: If there are no registrations or sponsors attached to any future events within the series then you may edit the recurrence settings. When making a change, you are only able to extend the date out, not move it back - unless you change the frequency.
- Click Done.


Make changes to an individual event in a recurring event series
The following items may be updated for an individual event.
|
|
NOTE: Once updates have been made on the Overview tab for the individual event, the event is no longer a part of the series. |

- Event Image
- Name
- Description
- Category
- Calendar
- Location Name
- Location Address
- Location Description
- Contact Information
- Pricing Description
- Images
- Videos
|
|
CAUTION: Changes made to the Attendee Setup tab, will effect ALL events. If Overview information changes are not needed from one event to another, but changes to the Attendee Setup are needed, you may wish to use the Copy Event function. If Overview changes are needed for a particular event, make the changes to the Overview tab as described below, then update the Attendee Setup. |
- From the Events module, select the desired event in the series.
-
- Make the desired changes to the Overview tab.
- Click Done.

Your changes will be saved, and the event is no longer associated to the series.
Remove/Delete a recurring event series
If needed, you can delete a recurring schedule:
- For the desired event, on the Overview tab, click the in the Recurrence section.
- Click the Delete button. This will delete the recurring schedule- NOT the initial event.

- Click OK to confirm that you wish to delete the recurring schedule.

All events in the recurrence have now been removed.
Continuing Education
This section will only appear if you subscribe to the Continuing Education module. Using the plus icon, you can add an existing component to, or create a new component for, any event. See Associate Continuing Education Components to Events for more information.

Registrations
This section will summarize all purchased registrations for this event. Clicking the plus sign will take you to the registration page for the event and allow you to add registrations to the event.

Contact Information
You can change the organization, contact person, and contact details for the event.

Hours
You can modify or set the date and hours for the event.

Images
You can add a gallery of images to your event page.

- In the Images section click the Add button.
- You may drag an image into the image box OR click the Upload button to browse to your image.

|
|
Image Sizes: It is recommended you resize images for the image gallery to a consistent size prior to upload. Landscape images are generally in a 16:9 or 3:2 ratio; roughly 1333 x 750 pixels max; square images are in a 1:1 ratio with a maximum size of 750 x 750 pixels recommended. |
- Enter Alt Text, a Title and Caption for the image if you choose.

- Click Crop & Save.
Follow the steps above to add additional images. You may change the order in which images are displayed by clicking the Reorder button.
Pricing
You can enter a summary of the event registration pricing here; it does not automatically populate with your registration types and pricing. If nothing is entered, this section will not display on the event page.

Goals
(Optional) You can detail your event goals here if you wish. These goals are internal and will not be visible or available to anyone without a back office login.

Overall Event Custom Fields
(Optional) The Overall Event Custom Fields are intended for staff members to track expenses and other internal event information. They can be included in various event reports, such as the Events Overview Report, Event Attendee Report and the Event Activity Report. By gathering data in these overall custom fields, you will easily be able to compare event to event, and even year over year.
ALL custom fields that have been created of type Event will automatically be displayed on each of your events Overview tab. You can populate these fields with desired information and/or add additional custom fields, from the Overview tab. NOTE: These custom fields are not the custom fields that you wish to include on your event registration pages or custom fields used for internal purposes specific to an individual event.
|
|
NOTE: The Overall Custom Fields are NOT custom fields that you wish to include on your event registration pages or custom fields used for internal purposes specific to an individual event. See Add Custom Fields to Event and/or Event Registration Form for instructions on setting up custom fields for your event registration page. |

Add an Overall Event Custom Field
Overall Event Custom Fields can be added "on the fly" from any event's Overview tab, or under Setup > Miscellaneous > Custom Fields.
- Select the event's Overview tab.
- Click the icon in the Overall Event Custom Fields section.

-
- Click the icon in the Edit Event Fields window.
-
- Click the
 icon to add a new field.
 - Configure the custom field as needed. See Custom Fields for further instructions on custom field types.
- Click Done.
Populate an Overall Event Custom Field
- Go to the Overall Event Custom Fields section.
- Click the icon in the Overall Event Custom Fields section.
-
- Populate the fields as needed.

- Click Done.

